Announcement

Collapse
No announcement yet.

Solar Cooking, Solar Ovens, Haybox Cooking (retained heat method)

Collapse
X
 
  • Filter
  • Time
  • Show
Clear All
new posts

  • Solar Cooking, Solar Ovens, Haybox Cooking (retained heat method)

    http://solarcooking.org/ret-heat.htm

    A very practical way to reduce fuel consumption when cooking grains and other long cooked foods.


    Retained Heat Cooking
    Once food is heated to boiling, cooking can continue in an insulated box
    Daily cooking [on a stove or over a fire] frequently includes a long simmering period which is required for many beans, grains, stews, and soups. The amount of fuel needed to complete these cooking processes can be greatly reduced by cooking with retained heat.
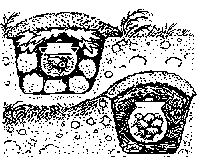
    Even today, in some parts of the world, a pit is dug and lined with rocks previously heated in a fire. The food to be cooked is placed in the lined pit, often covered with leaves. Then the whole thing is covered with a mound of earth. The heat from the rocks cannot [easily] escape and the food is cooked very slowly.
    Another version of this method consists of digging a pit and lining it with hay or another good insulating material. A pot of food which has previously been heated up to a boil is placed in the pit, covered with more hay and earth, and allowed to cook slowly with the retained heat.
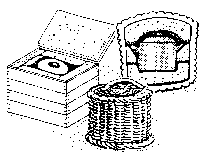
    This latter method is the direct ancestor of the "Haybox Cooker," which is simply a well-insulated box or basket lined with a reflective material into which a pot of food previously brought to a boil is placed. The insulation greatly slows the loss of conductive heat, and the shiny lining reflects the radiant heat back into the pot. This works best when the pot fits snugly into the insulation with no air in between.
    Such a box or basket can easily be made of inexpensive, locally available materials. It can be wooden, or cardboard, or any combination. Hay, straw, rushes, feathers, sawdust, rags, wool, shredded paper, etc. are all good insulating materials.
    Principles to be kept in mind are these:
    • Insulation should cover all six sides of the box.
    • The box should be airtight.
    • The inner surfaces of the box should be of a heat-reflective material.
    There are some adjustments involved in cooking with haybox cookers:
    • Less water should be used since it is not boiled away.
    • Less spice in needed since the aroma is not boiled away.
    • Cooking must be started earlier to give the food enough time to cook at a lower temperature than on the solar cooker or over a fire.
    • The food should boil for several minutes before being placed in the box. This ensures that all the food is at boiling temperature, not just the water.
    • Haybox cookers work best for large quantities, as small amounts of food have less thermal mass and cool Preheated stones could always be put in together with the pot to prove the additional thermal mass needed to keep the temperature up over a long period of time.

    (This above portion of this article was excerpted from Cooking with the Sun, State Technical College, Altötting, Neuötting Str. 64 c, 84503, Altötting, Germany) Using an SBC as a "Haybox"

    When combining retained heat and solar cooking, if food has gotten thoroughly hot in an SBC, but clouds arrive before the food is finished cooking, a switch from solar to retained heat cooking should be made before the oven temperature drops below the boiling point. For large recipes this may be accomplished by simply closing the reflective lid on the pots of cooking foods. For smaller recipes, the solar oven is opened, taking care not to allow steam to escape from under the lids, pots are pushed close together along with any heated additional mass. Insulating pads or soft cushions are tucked closely around the pots and well heated mass. The SBC lid is then closed. This effectively makes the transition from solar to retained heat cooking. The cooker lid remains closed until shortly before serving time, when the food is tested. If not completely done, a very little conventional fuel will usually finish the job. Usually solar/retained heat cooking is done right where the SBC is located. However, a lightweight portable SBC can be moved temporarily indoors for its retained heat cooking time if the sun clouds over or if it rains. It may also be brought inside more or less permanently during the off season or at night and function as an insulated box for retained heat cooking. Used in this way the SBC continues to save fuel rather than simply being stored until conditions are right for solar cooking.
    This document is published on The Solar Cooking Archive at http://solarcooking.org/ret-heat.htm. For questions or comments, contact webmaster@solarcooking.org
    Please do not ask me for medical advice, I am not a medical doctor.

    Avatar is a painting by Alan Pollack, titled, "Plague". I'm sure it was an accident that the plague girl happened to look almost like my twin.
    Thank you,
    Shannon Bennett

  • #2
    Re: haybox cooking or retained heat method

    Our plan uses an old fiberglass cooler. The cooler should retain the heat very well on its own but we plan to add reflective foil to increase the heat retention. Hot cereal for breakfast that was prepared the night before. Or, some whole grain dishes that would normally take hours to cook on a stove using large amounts of fuel can cook without any attention or additional heat all day in the haybox.
    Please do not ask me for medical advice, I am not a medical doctor.

    Avatar is a painting by Alan Pollack, titled, "Plague". I'm sure it was an accident that the plague girl happened to look almost like my twin.
    Thank you,
    Shannon Bennett

    Comment


    • #3
      Re: haybox cooking or retained heat method

      thanks, Shannon, good info. and good commentary.

      I like this method with high heat and for thing s like ptoatoes, and for discrete items that need to roast, like chuked up veggies. Good for stews too- but there has to be enough heat to keep the temp close to 200 degrees F during the entire cooking period. Thats the temp you'll find in most slow cookers.

      IF it falls much below that- IIRC the majic number is 160 F- you risk a nasty case of food poisoning...so it cant be set up, ignored for a day; and then expected to be allright. IF theres any question- soups and stews can be briefly reheated and boiled and that may be protective of some pathogens.

      IF you plan to use this method with any regularity, and arent familiar with it-then I highly recommend a good book on the subject, and the right kind of coking vessels and a good food thermeometer that you can check safety with.

      One spin off method that comes from this is thermos cooking- particularly suited to samll quantities of whole grains overnight. Less risk, since the times are shorter- and theres less food prone to food borne illness used. Let me see if i can find a good article and import that.
      Upon this gifted age, in its dark hour,
      Rains from the sky a meteoric shower
      Of facts....They lie unquestioned, uncombined.
      Wisdom enough to leech us of our ill
      Is daily spun, but there exists no loom
      To weave it into fabric..
      Edna St. Vincent Millay "Huntsman, What Quarry"
      All my posts to this forum are for fair use and educational purposes only.

      Comment


      • #4
        Re: haybox cooking or retained heat method

        simple method:

        Wheat in a Thermos
        ===============
        ½ cup wheat kernels
        1 qt. Boiling water
        Place wheat in thermos and pour water to fill thermos. Screw on lid. Sit 2 hours or overnight. Strain.
        - from “Cookin’ with Home Storage” by Peggy Layton http://www1.icserv.net/D100001/X100043/books.html
        Serve with honey or sugar as breakfast cereal.
        Upon this gifted age, in its dark hour,
        Rains from the sky a meteoric shower
        Of facts....They lie unquestioned, uncombined.
        Wisdom enough to leech us of our ill
        Is daily spun, but there exists no loom
        To weave it into fabric..
        Edna St. Vincent Millay "Huntsman, What Quarry"
        All my posts to this forum are for fair use and educational purposes only.

        Comment


        • #5
          Re: haybox cooking or retained heat method

          a little more info from the venerable Kurt Saxon:
          The Survival Foods And Gardening Section

          SAVING MONEY WITH
          A THERMOS BOTTLE

          By Kurt Saxon

          Many subscribers write that they will eventually buy all my books but they can't afford them at this time. Many are students on limited allowances. Some are on Social Security or pensions. Others are on Welfare, as I was after an injury, when I got $86.00 per month in l969. I paid $50.00 for rent and had only $36.00 left for food and incidentals. Even so, I ate better than before. Prices were indeed lower then but, surprisingly, the costs of the more basic foods have hardly changed.

          For instance, 60 pounds of hard red winter wheat, the highest in protein, minerals and vitamins, averages $8.00 (240 breakfasts at 4 cents each). Brown rice, also higher in nutrition than white, costs $14.00 for 25 pounds. Also 200 servings since rice swells twice as large as wheat. These are bought in bulk at any feed and seed store.

          Wheat and rice are the staple foods of billions and, if prepared my way, will fill you up, give you boundless energy; and cost nothing, if you consider that the saving in gas or electricity will offset their purchase prices.

          I do not mean that wheat and rice, plain, is what I am asking you to live on. When is the last time you have eaten a potato plain? I am simply suggesting you process all your food in inexpensive, energy-saving ways and eat better than you ever have for less than $10.00 per week. Then you can not only afford all my books but many other things you have wanted but had to do without because most of your food budget goes to pay others to do what you should learn to do for yourself.

          The thermos and the dehydrator are first steps in eating better for so much less. As a Survivalist, you will have to understand food preparation or you might as well eat, drink and be merry in the short time you have left.

          A great factor which makes this practical and easy to understand is that since it is by a man, it is basic, gut-level and moron-simple. You won't even need to open a cookbook.

          First the thermos. There are three kinds but only one is practical. Forget the cheap, plastic ones lined with Styrofoam. These might cook oatmeal and white rice but do not have the heat holding power you need. Silvered glass thermoses are fine, but a bump will break them. Also, since you are going to do actual cooking and will use a fork to remove the contents, they will not hold up.

          The only practical cooking thermos is the Aladdin Stanley. It is lined with stainless steel, is well insulated and will keep steaming hot for up to 24 hours and holds a quart. It is also unbreakable, with a lifetime warranty. It costs $22.00 at Wal-Mart or can be ordered through any sporting goods store. It would save you its price in a few days. If you have a family, get two or three.

          Most foods cook at 180 degrees or more. We are used to boiling, which is 212 degrees, and foods do cook faster, the higher the temperature. But if time is not important, cooking at a lower temperature is even better as most vitamins are not broken down. Thus, if you cook at a minimum heat, you save nutrition.

          A great factor in thermos cooking is the saving in the cost of energy. Whereas it would take about two hours to cook whole-grain wheat or nearly an hour to cook brown rice. Thermos cookery takes only five minutes to cook anything. So it is indeed possible to save as much in energy as you spend on the food. You can imagine the convenience of thermos cookery in camping, which would save on wood, weight of food carried, and no food odors to alert bears or enemies.

          Thermos cookery is also an advantage to anyone living where he is not allowed to cook. There are no cooking odors to tip off the landlord.

          First, you need the thermos. Then you need a heat source. If you are in a non-cooking room, buy a cheap, one burner hot plate from your local Wal-Mart, Target, Sears etc. You will need a one quart saucepan. You will also need a special funnel to quickly pour the pan's contents into the thermos, plus a spoon or fork to help the last of the food into the funnel.

          To make the funnel, cut off the bottom four inches from a gallon plastic milk container. If you do not buy milk or cannot find an empty container, go to your nearest laundromat. You will find in the trash receptacle, an empty gallon bleach bottle. Use that the same as the milk container but wash it until there is no more bleach odor.

          The first step in thermos cookery is to fill the thermos with water up to the point reached by the stopper. Empty the water into the saucepan and make a scratch or other indelible mark at the water's surface inside the saucepan. This will allow you to put just enough water in the saucepan, as too much will leave food out and too little will give you less cooking water.

          Just to test how the cooker works, start with four ounces of wheat. You do not need to buy 60 pounds. You can buy two pounds from your health food store for about $.80 This would give you eight meals at 10 cents each.

          In the evening, put four ounces in your saucepan, plus a half-teaspoon of salt to prevent flatness, even if you intend to sweeten it. Fill to the mark with water. (If you have hot water, let the tap run until it is hottest. Tests have shown that less energy is used in using hot tap water than in boiling from cold.) Bring the contents to a rolling boil, stirring all the while. This will take from three to five minutes.

          Then quickly, but carefully, swirl and pour the contents into the funnel and help any lagging matter from the pan to the funnel and into the thermos. Cap firmly but not tightly, shake and lay the thermos on its side, to keep the contents even.

          Next morning open the thermos and pour its contents into the saucepan. With four ounces of dry wheat, you will now have at least 3/4 pound of cooked wheat and about a pint of vitamin and mineral enriched water. It has a pleasant taste. Drink it.

          You can now put milk and sweetener on it or margarine, salt and pepper, etc. If you can eat the whole 3/4 of a pound, you will be surprised at how energetic you feel for the next several hours. An added bonus is its high fiber content.

          Having tried the four ounce portion, you might next use eight ounces. This will absorb most of the water. It is unlikely that you could eat a pound and a half of cooked whole grain wheat. You can either divide it and eat the other half for supper or if you are a family man, make it the family breakfast food to replace the expensive brand.

          If you have children, get them into the act by fantasizing they are Rangers on a jungle patrol.

          For lunch, prepare a few ounces of hamburger or other meat chopped finely, plus chopped potatoes and other vegetables the night before. After breakfast, put these and the right amount of water in the saucepan and prepare as usual. At lunchtime you will have a quart of really delicious stew. Since nothing leaves the thermos in cooking, as contrasted to the flavor leaving stew cooking on the stove, you can understand the better tasting, higher vitamin content of thermos stew.

          Lunch and possibly supper should not cost you more than 25 cents if you study the article on the dehydrator. Jerky and dried vegetable stew is good and costs little.

          The brown rice dishes could also be either a main course or desert. Brown rice has a much greater swelling factor than wheat so four ounces of rice will pretty much fill the thermos. You can put vegetables and meat in it to cook or try a favorite of mine. It is four ounces of brown rice, 9 cents; one ounce of powdered milk, 10 cents in a large box; two ounces of raisins, 22 cents; one teaspoon of salt; some cinnamon and four saccharine tablets. Cook overnight. This is 46 cents for 1 1/2 pounds of desert.

          With some experimenting, you can become an expert in thermos cookery. If you are single and live alone, you could, conceivably, eat nothing except what you cooked in a thermos. But if you are married, and especially if you have children, don't push it. Even with the economy of this system, it's not worth alienating your family. If your wife doesn't like it, challenge her to make the food tastier and think up some thermos recipes. You might also tell her the advantages of thermos cookery.

          For one thing, she would spend much less time in the kitchen. What with the expected brownouts, she could do all the cooking in five, ten, fifteen minutes, depending on how many thermos bottles she used. Another important factor is that, especially during the heat waves, the home would not suffer the added heat from the kitchen. This would also cut down on the air conditioning costs.

          A tip you may not have known is that the pilot light in a gas stove not only raises the temperature in the kitchen but also accounts for a fourth of all the gas burned in the stove. Matches are much cheaper. Turn the pilot light off.
          Upon this gifted age, in its dark hour,
          Rains from the sky a meteoric shower
          Of facts....They lie unquestioned, uncombined.
          Wisdom enough to leech us of our ill
          Is daily spun, but there exists no loom
          To weave it into fabric..
          Edna St. Vincent Millay "Huntsman, What Quarry"
          All my posts to this forum are for fair use and educational purposes only.

          Comment


          • #6
            Re: haybox cooking or retained heat method

            XMG The best resources for perilous times.

            --------------------------------------------------------------------------------


            Cooking With A Thermos Bottle
            Why? Heat for cooking is not always available, or fuel may need to be conserved. When using a solar oven a thermos allows you to have hot food and drinks in the morning -- before the sun is available for cooking -- or even late at night.

            It is important to use a thermos that will hold heat the longest, and last the longest under heavy use and abuse. Aladdin Stanley claims their steel thermos bottle is the toughest and best you can buy. Many agree. They guarantee it for life. I bought a one quart model at Wal-Mart for $23.96.

            For a vast selection of different ones, as well as a lot of other good information, go to Thermos Online.

            Before trying it, read the article by Kurt Saxon on "Saving Money With A Thermos Bottle".

            Whole Wheat Cereal
            Fill thermos 1/4 full of wheat. Then fill 3/4 full with boiling water. Cap and let stand overnight.
            (Taken from Just Add Water, by Barbara G. Salsbury.)

            Thermos Wheat Sprouts
            2 cups 2-day wheat sprouts
            4 cups boiling water
            Put 2 cups boiling water into a 1 quart glass or metal lined thermos to preheat for 5 minutes. Put wheat sprouts and remaining water into thermos, cap tightly and let sit for at least 1 hour. This is best when made at night for a quick, easy breakfast. When left overnight, the kernals pop open and are very easy to chew.
            (Taken from Natural Meals In Minutes, by Rita Bingham.)

            Thermos Noodle Soup
            1 1/2 cup dry spaghetti
            2 cups boiling water
            2 teaspoons beef or vegetable bouillon
            1 teaspoon dry minced onion
            1/2 teaspoon parsley
            Add all ingredients to 1 qt. thermos that has been heated with additional boiling water. Seal and tilt jar for 15 minutes. This stays warm for 24 hours in a glass or metal thermos, so it can be made in the morning for lunch or dinner. Egg noodles would hold up better during longer "cooking" times.
            (Taken from Natural Meals In Minutes, by Rita Bingham.)

            Thermos Tuna A 'la King
            4 tablespoons dry milk powder
            2/3 cup elbow macaroni
            dash salt
            1 1/2 cups boiling water
            Put all ingredients into a 1 qt. thermos that has been heated with additional boiling water. Stir, seal and tilt thermos for 15 minutes. Open and add:
            6 1/2 oz. can tuna, undrained
            1/4 teaspoon chicken-flavored bouillon
            1 teaspoon parsley
            Stir and eat. For a creamier dish, use only 1 cup boiling water and heated juice from drained tuna. Serves 2.
            (Taken from Natural Meals In Minutes, by Rita Bingham.)

            Others

            The Perfect 3.3 Cent Breakfast
            Saving Money With A Thermos Bottle
            If you have recipes using a thermos bottle to cook food, please share them with us.
            Upon this gifted age, in its dark hour,
            Rains from the sky a meteoric shower
            Of facts....They lie unquestioned, uncombined.
            Wisdom enough to leech us of our ill
            Is daily spun, but there exists no loom
            To weave it into fabric..
            Edna St. Vincent Millay "Huntsman, What Quarry"
            All my posts to this forum are for fair use and educational purposes only.

            Comment


            • #7
              Re: haybox cooking or retained heat method

              a solar cooker can be built out of foil, glue and a cardboard box. you need a box about a cubic yard, glue and foil. cut the top and bottom out. then cut the box along a seam. this will give you one long piece of material. glue the foil on one side. get a metal pot and paint it black. use heat resistant paint.
              on a sunny day set the box up so you have an enclousure. point it in the direction of the sun. put the pot inside the enclosure. cook. this will probably not boil water but it will cook. kinda of like a crock pot. rotate the enclosure with the suns movement.

              Comment


              • #8
                Re: haybox cooking or retained heat method

                Cool, Thank you rjprrt

                Comment


                • #9
                  Re: haybox cooking or retained heat method

                  Originally posted by rjprrt
                  a solar cooker can be built out of foil, glue and a cardboard box. you need a box about a cubic yard, glue and foil. cut the top and bottom out. then cut the box along a seam. this will give you one long piece of material. glue the foil on one side. get a metal pot and paint it black. use heat resistant paint.
                  on a sunny day set the box up so you have an enclousure. point it in the direction of the sun. put the pot inside the enclosure. cook. this will probably not boil water but it will cook. kinda of like a crock pot. rotate the enclosure with the suns movement.
                  Here is a picture of a simple cheap solar cooker. Many more examples can be found at the link posted by Shannon

                  http://solarcooking.org/

                  and

                  http://www.cookwiththesun.com/solar.htm

                  Click image for larger version

Name:	min7.jpg
Views:	1
Size:	22.7 KB
ID:	647745
                  http://novel-infectious-diseases.blogspot.com/

                  Comment


                  • #10
                    Re: haybox cooking or retained heat method

                    I just found this source for additional information on "fireless cooking" or modified hay box cooking. It has all sorts of advice including recipes.

                    http://community-2.webtv.net/adowning/FirelessCooking/

                    ***snipped from link***

                    HOW TO MAKE A FIRELESS COOKER
                    Almost any container and insulation can be used to make a fireless cooker. The only absolute is that there must be 3-4 inches of insulation above, below and all around the pot of food. My first fireless cookers were cardboard boxes with several inches of newspaper under the pot and old towels around and over the pot. I always intended to build a chest and paint it with Tole paintings, but somehow I still haven't found the time. Today, I use a Coleman cooler. Not as picturesque, but it works very well. I have some newspaper on the bottom of the cooler to keep a hot pot from melting the plastic and still use old towels around and over the pot. Sometimes I use one of the foil survival blankets I bought at Wal-Mart for $2. It does a good job of holding in the heat. I've known of people to use a foot locker and old pillows for cooking a meal with serveral dishes. I've also seen styrofoam peanuts recycled by putting them in old pillowcases from a thrift shop and used as the insulation in a cardboard box fireless cooker. Of course, if you're a traditionalist you can always use fresh hay and have an authentic hay box! It's up to you, your imagination and what's available.
                    "In the beginning of change, the patriot is a scarce man (or woman https://flutrackers.com/forum/core/i...ilies/wink.png), and brave, and hated and scorned. When his cause succeeds, the timid join him, for it then costs nothing to be a patriot."- Mark TwainReason obeys itself; and ignorance submits to whatever is dictated to it. -Thomas Paine

                    Comment


                    • #11
                      Re: haybox cooking or retained heat method

                      Camping by Rex Hazelwood (1950 edition)

                      The Hay Hole


                      A hay hole or hay box is most useful for cooking stews porridge etc.

                      The actual cooking takes longer but fuel is saved, as the food goes on cooking by it's self, and a hot supper can await the campers after a long day's outing.

                      A may be dug about one foot deeper and wider than the dixie.

                      Put a deep layer of closely packed hay in the bottom, stand the dixie in the middle, and pack it round as tightly as possible with hay.

                      Make a bag of some old material large enough to fit the top when well stuffed with hay. This top can be weighted down and can be protected in wet weather.

                      All food should be put in boiling.

                      Cooking in a hay hole takes at least three times as long as an ordinary fire.

                      Beans should boil for half an hour, porridge and macaroni for 10 minutes and rice for 5 minutes before being put in the hay hole. Stew should simmer for at least half an hour and potatoes for ten minutes.

                      Comment


                      • #12
                        Re: haybox cooking or retained heat method

                        ok, so it isn't a haybox or a thermos, but my partner has now been cooking quite happily on our home-made solar cooker for a couple of weeks. here is a link to a photo of it in action.....

                        solar cooker in action

                        it boils water incredibly well and paul now makes a mean beef mussaman curry - the rice is absolutely perfect using the absorption method - only problem for us now is keeping things warm enough to have later in the day.

                        and by going to our local recycling centre, dumpster diving and visiting building sites, it cost us a total of $15 AUD to make

                        Comment


                        • #13
                          Re: haybox cooking or retained heat method

                          Bump this. This discussion and links about cooking with solar energy or efficient retained heat method can prolong your fuels supplies or help you cook in an emergency situation if plan ahead for such an event.

                          Here is a discussion for efficient but very expensive stainless steel (retained heat) thermal cooking pots that are often used in Asia.


                          Cook green with the thermal cooker
                          the coolest energy saving pot


                          I like using the slow cooker to make chinese soups, but it can consume quite a bit of energy because it is turned on for at least 2 to 4 hours or even longer during cooking time.
                          The green movement is picking up again and more people are choosing to live green. If you are part of the green movement, you might feel uncomfortable using the slow cooker.
                          For others, energy costs may be a concern.
                          No worries, a greener cooking alternative is available.
                          Thermal cooking

                          The Japanese was the first to invent the thermal cooking pot which uses trapped heat to cook food.
                          It has three major components:
                          1. an inner pot
                          2. an outer container with insulation, and
                          3. an air-tight cover

                          The inner pot is usually made of stainless steel.
                          Soup ingredients and water are brought to a boil in the inner pot over the stove. It is then placed into the insulated outer container. The outer container is sealed with the air-tight cover.
                          Since the outer pot is sealed and there is insulation all around, the heat in the inner pot has nowhere to go. It can "concentrate" on cooking the soup. Given sufficient time, the trapped heat will cook the soup and ingredients.
                          This is a very energy-efficient way to cook. The food also does not get burnt since the heat isn't high enough to burn.
                          The thermal cooker is very versatile. Besides soups, it has been used to cook many different food. I find it an ideal "green" soup making pot. The only problem is it is time-consuming. If you like your food fast, this is not the pot for you.
                          Last but not least, it is a great food warmer and portable food container. Because of the air-tight cover, it is spill-proof and leak-proof. Ideal for packing food for picnics or pot lucks.
                          The 2 top brands of thermal cooking pots are <!-- BEGIN: Shopzilla Publisher Asset HTML --> Zojirushi <!-- END: Shopzilla Publisher Asset HTML --> and <!-- BEGIN: Shopzilla Publisher Asset HTML --> Tiger <!-- END: Shopzilla Publisher Asset HTML -->. Both are Japanese brands.
                          There are many cheaper versions coming from Taiwan and China but their quality and cooking effect are not as good as the Japanese ones.

                          Thermal Cooking Pot Tips

                          1. It takes considerable time for the thermal pot to do its cooking work. Plan about 3 to 6 hours for the soups to be ready.
                          2. Since the heat is trapped, so is the liquid. There will be little evaporation and therefore less reduction of the liquid. Prepare just enough water for the soups.
                          3. Do not cook chinese herbal soups in thermal cooking pots. The inner pot is made of steel or stainless steel, and certain chinese herbs react with metal. Not all chinese herbs have this reaction but it is better to avoid it especially if you like using pre-packed chinese herbal soup packs containing several different types of chinese herbs in varying quantities.
                          http://www.homemade-chinese-soups.co...al-cooker.html
                          http://novel-infectious-diseases.blogspot.com/

                          Comment


                          • #14
                            Re: haybox cooking or retained heat method

                            Originally posted by Laidback Al View Post
                            Here is a picture of a simple cheap solar cooker. Many more examples can be found at the link posted by Shannon

                            http://solarcooking.org/

                            and

                            http://www.cookwiththesun.com/solar.htm

                            [ATTACH]623[/ATTACH]
                            I made one of these last year from a couple of cardboard boxes, etc. It worked fine; cooked rice and lentils in a few hours. Not good for pasta though.

                            Comment


                            • #15
                              Re: haybox cooking or retained heat method

                              I have a thermal cooker, but don't use it frequently because there are only two people in the household and I don't cook large amounts of food at a time any more. If you don't fill the cooker all the way, the contents don't stay hot as long. I do regularly use a thermos to cook oatmeal or cracked wheat overnight, but it doesn't stay very hot either. The Stanley Thermos that I had years ago did a much better job. I'm not sure why the new ones don't seem to retain heat as well.

                              The thermal cooker is super for making yogurt, however. I typically make a half gallon at a time, and it's the easiest way to make such a large batch.

                              Here is another site about retained-heat cooking in all its forms: The Thermal Cooker Weblog.

                              Comment

                              Working...
                              X