Check out the FAQ,Terms of Service & Disclaimers by clicking the
link. Please register
to be able to post. By viewing this site you are agreeing to our Terms of Service and Acknowledge our Disclaimers.
FluTrackers.com Inc. does not provide medical advice. Information on this web site is collected from various internet resources, and the FluTrackers board of directors makes no warranty to the safety, efficacy, correctness or completeness of the information posted on this site by any author or poster.
The information collated here is for instructional and/or discussion purposes only and is NOT intended to diagnose or treat any disease, illness, or other medical condition. Every individual reader or poster should seek advice from their personal physician/healthcare practitioner before considering or using any interventions that are discussed on this website.
By continuing to access this website you agree to consult your personal physican before using any interventions posted on this website, and you agree to hold harmless FluTrackers.com Inc., the board of directors, the members, and all authors and posters for any effects from use of any medication, supplement, vitamin or other substance, device, intervention, etc. mentioned in posts on this website, or other internet venues referenced in posts on this website.
We are not asking for any donations. Do not donate to any entity who says they are raising funds for us.
Here is a link for a "Home Made Thermal Shade". The idea is once the home is warm to help use this to help to slow the loss of heat from the home via windows. The article is from Mother Earth News magazine.
Simple, money-saving thermal window shades made from insulated fabric with Velcro edging keeps temperatures moderate and eliminates window heat waste.
The goal of the article appears to be to provide plans for making several models of home made thermal shades that can be easily attached to widows during the night or colder periods to cut down on heat loss. The shades can still be easily move to allow passive solar heating (sun light) to enter the home during the day.
Wonder if a similar design could be made with space blankets to reflect or limit sunlight (and passive heat) entering thru windows in warmer climates?
Having lived through more than my share of ice storms (and loss of electricity), I use a variant of this. I took the cheap comforter inserts from Ikea and glued a mylar emergency blanket to it. Then I use clip on curtain rings to hang them in between the window and my thermal drapes on a cafe rod put up with command hooks. Previously I put it up using craft wire and two hooks but you can't really pull them open and closed well - the curtain rod words better.
I also **** quilts along outside walls and across hallway entrances to act as a heat blocker.
After scanning the article Jonesie posted I thought I'd post some of my own experiences and opinions regarding splitting fire wood. First off sometime during the winter we just expect the power to go out. It happens so we prepare for it. One of our plan B's is to heat our home using a fire place, so fire wood is a must. Originally my husband made it a ritual to go out and split the wood by hand using metal wedges designed for the task and sledge hammer. This is a serious amount of work.
One weekend after my husband had cut the tree trunks into fireplace lengths with a chain saw, I rented gasoline fueled log splitter. The easy part was towing it home and backing it up next to the log pile. There was some initial gripping involved as this was a definite change in the annual ritual. That weekend the two of us easily split and stacked a cord of wood. This has now become part of our new fall ritual. My dear husband has even talked of buying one.
Please note; like most tools, (power tools especially) log splitters can be dangerous. They should be used safely and in accordance with proper instructions. It would probably help to read the manufacturer's instructions carefully and follow proper safety precautions. Children should have adult supervision while in the area around this tool. I would not allow a young child to use this tool supervised or not.
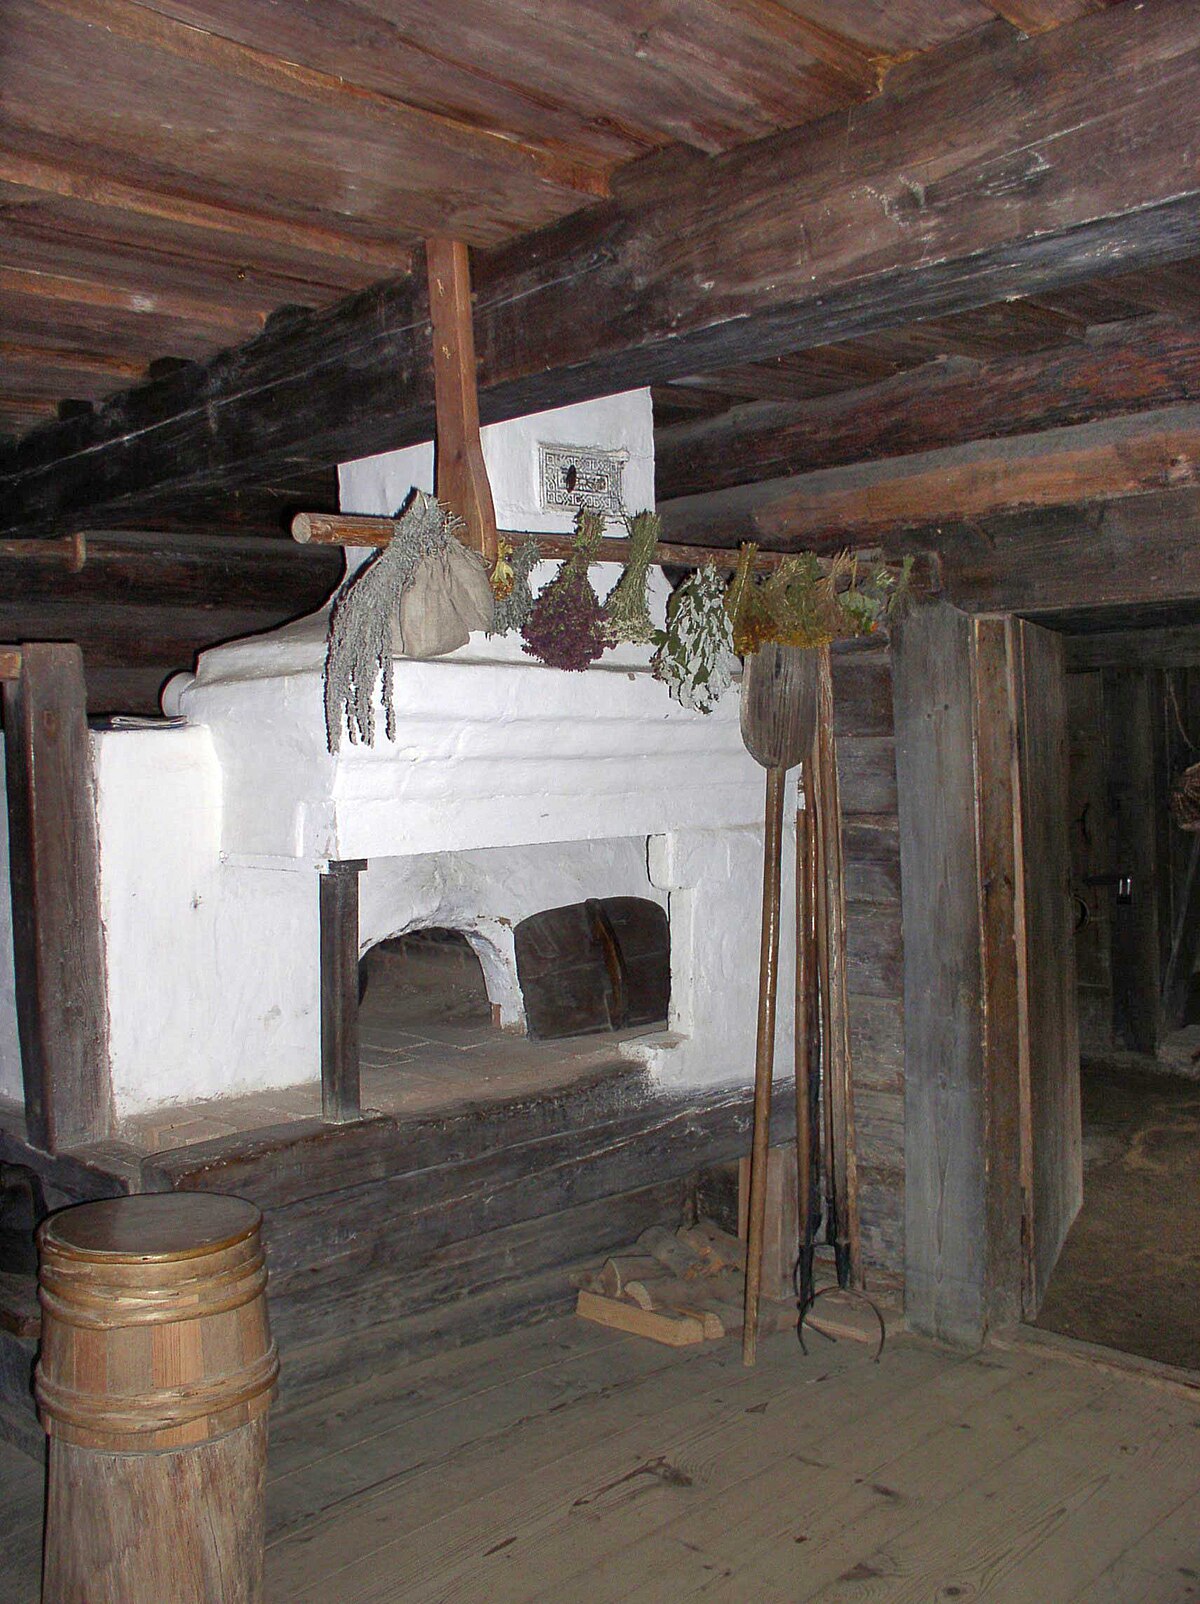
A Russian oven is very similar to a Masonry Fireplace in construction and purpose. The difference appears to be Russian oven has the dual purpose of cooking/bread baking as well as providing heating. For more information see links below:
"A Russian oven or Russian stove (Russian: Русская печь) is a unique type of oven/furnace that first appeared in the 15th century[1]. It is used both for cooking and domestic heating.[2][3] The Russian oven burns firewood... (snip)
Construction
A Russian oven is designed to retain heat for long periods of time.[5] This is achieved by channeling the smoke and hot air produced by combustion through a complex labyrinth of passages, warming the bricks from which the oven is constructed.[4][3]"
Learn to build your own low-cost, highly efficient masonry fireplace (also known as a masonry stove or Russian fireplace), plus masonry bread ovens and earth ovens.
I finally got around to collecting one whole cord of hardwood to burn in my fireplace should the power go out. But I highly recommend that you build firewood racks before you obtain any firewood. I didn't. Now I have to stack the racks myself with wood I have laying all around the yard. What a mess..plus a lot of extra work!
I am tying a large tarp over each rack to keep the snow and rain off the firewood, to keep it dry and ready to burn.
For those of you ... like me...who have no experience with splitting the few large logs you might get, here is an informative article on splitting those logs:
How to split wood
Editor's note: This article was written and sent to us by Anne and David, two visitors to woodheat.org. We appreciate their contribution and hope you enjoy it.
--------------------------------------------------------------------------
Size and strength are not as important in effective wood splitting as determination and technique. The co-authors regularly split wood together. Anne is 34 years old, 130 pounds and relatively new to splitting. David is 61 years of age, 200 pounds and has decades of experience splitting wood. The only concession made for the difference in size and strength is that Anne's rounds are cut two-thirds as long (proportionate to our weight difference).
We thoroughly enjoy splitting firewood - a rare art and skill in this technological age. Our intent here is to present ideas that might refine or accelerate the learning process for someone and make wood splitting more enjoyable and effective for them.
Preparation
Cut firewood logs into "rounds" of reasonable length. The longer the round for any given diameter and condition, the more difficult it will be to split. If you are just starting or are having difficulty splitting, cut logs into short (twelve-inch) lengths. Increase length later as your ability increases. If you have any choice in the matter, avoid wood that is terribly knotty or set it aside "until later".
Use a "wood splitter's maul" rather than an ax. The maul is basically a wedge with a handle. The advantage of the wedge shape over the ax is that the wedge, with its more abrupt slope, is less inclined to stick in the wood than the gentler slope of the ax head. The steep slope of the maul also increases outward pressure on the wood.
Save the wedges and sledge for really tough wood. Wood that splits easily or with moderate difficulty can be split faster with a maul which avoids the necessity of "setting" the wedge and striking it repeatedly. Keep a couple of wedges on hand for really gnarly wood.
Use a six-pound maul rather than the eight or ten-pound models. A lighter maul can be swung much FASTER. Velocity is more important than mass in producing results. Perhaps this is related to the laws of physics, which state that energy is proportional to the SQUARE of velocity, but only DIRECTLY proportional to mass. Thus, the maul head should be traveling as fast as possible when it strikes the wood. It takes a very strong person to properly accelerate a large maul.
Position yourself slightly uphill from the round to be split if at all possible. This employs weight and leverage to maximize effectiveness of the blow. Place rounds on reasonably hard ground to prevent the force of your blow from being absorbed by soft ground below. Striking a round that is too high or one that is on soft ground decreases the energy delivered to the wood by the maul head.
Study the round to be split for existing cracks or other signs of weakness and align yourself with these as your target. Look down the exterior of the round to avoid splitting through any obvious obstructions such as large knots or twisted grain.
The most effective blow is delivered near the edge of the round, NOT the center. By hitting near the edge (bark), the maul strikes at 90 degrees to growth rings where they are wide and vulnerable. Look and listen for the beginnings of a split. Strike the split with the next and subsequent blows and watch it progress across the round. After the split is well started, strike the far side along the split. Repeat with increasing aggression as necessary.
Make the best blow you can EACH time. Never make a half-effort, even if it becomes necessary to rest between swings. Light blows seldom split wood and almost always discourage and tire you for no gain.
Learn to strike within a quarter-inch of your intended spot. This is accurate enough for effective wood splitting and is not too difficult to achieve with practice and focus. Hold the maul with the same grip each swing because any slight difference in position of the handle in your hands will produce a large change at the striking edge of the maul.
Swing with authority
Stand with feet shoulder width apart facing the round. Measure your distance by placing the maul where you wish to strike with arms fully extended, then step back a third or half step. This will encourage you to lean forward a little as you complete the swing and it will add power. Hold the maul horizontally near waist level, elbows comfortably bent, one hand at the base of the handle, palm facing toward you, the other hand at the neck, thumb next to the maul head, palm facing away from you. Switch hands if that is more comfortable for you. As a challenge, you can learn to use either grip equally well.
Flex your knees and bend slightly at the waist. Abruptly raise the maul overhead, extending arms high, straightening back and knees, and rising up on toes to gain maximum potential energy. During this up swing, allow the hand next the maul head to slide down the handle to meet the hand holding the butt of the handle. When your hands are directly overhead, the maul head will be at some angle behind the vertical line of your body.
With no delay, begin a very forceful downswing. Concentrate your vision on the point of intended impact. Bend at the waist and bend your knees to involve all of your body in the swing. At the very last instant before the maul head strikes the wood, pull it back toward you very slightly using your abdominal muscles and legs not your arms. This seems to increase accuracy and accelerate the head to make the blow much more effective. Also, if you can learn to "snap your wrists" downward at the last instant you further accelerate the maul.
DO NOT allow your vision to wander from the striking point during the swing. Focus your attention on striking all the way through the piece to the very BOTTOM. This is the same approach used in the martial arts. Strike toward where you want the blow to finish. Visualize the maul head penetrating the piece completely and visualize the split pieces falling away. KNOW that the wood will not resist the blow. Anticipate success.
Observations
There are those who split well using different tools and techniques. We respect them and encourage them to describe their methods to help others to learn. Here are some tips we've discovered.
Firewood cut too long for its intended use is a constant source of irritation.
Branching sections ("Y" pieces) can be split effectively in most species. Cut "Ys" as close as possible on the small ends then split with the "Y" down.
Fiberglass handles can be pleasant to use and they are nearly indestructible.
NEVER strike long (overstrike) which is an embarrassingly amateur way to break a maul handle.
Six pound mauls use the same handles as a standard sledgehammer instead of the much more expensive special handles for heavier mauls.
The heat output (Btu content) of wood is proportional to its density (weight per unit volume) when air-dried. A cord (128 cubic feet or 4x4x8 feet) of dense hardwood weighs considerably more than a cord of softwood and thus has considerably more total heating potential. This is not to say that one should avoid lighter wood; in fact, it often makes excellent firewood. Because more bulk is required to do the same job, however, light wood should cost less in money or effort.
Some species of wood tend to have straight grain that splits well (red oak). Others have entangled fibers and can be very difficult to split (elm). Some wood splits easiest when green (live oak) and some split much easier when dry and brittle (some pines).
Stack firewood where air and sun can dry it thoroughly by the time you will burn it. Twenty-percent moisture content is supposedly ideal. "Dry" is good enough. You can burn wood that is not dry but there is some loss of heating potential through evaporation of moisture. In a pinch make a hot fire of any dry wood available and add the unseasoned wood.
Check in craigslist.org in your area. You might find firewood being given away free. Many Ash trees are being cut down, and homeowners are giving away the wood.
?When I retire I'm going to spend my evenings by the fireplace going through those boxes.
There are things in there that ought to be burned.?
Richard M. Nixon - US President (1969-74)
?May you always have walls for the winds, a roof for the rain, tea beside the fire,
laughter to cheer you, those you love near you, and all your heart might desire.?
~ Irish Blessing ~
Some college kids as a prank, wall papered the whole apartment with foil. Covered the ceiling, walls, cabinets, doors and windows with foil. The news crew got so warm while filming the story they had to strip down to their shorts. The foiled apartment (sorry for the pun) acted as a parabolic dish. I keep a large roll of foil (Costco) and staples (no I mean stapler) for my safe room should I have to fall back to emergency mode with no heat and/or fuel.
Here is a link for a "Home Made Thermal Shade". The idea is once the home is warm to help use this to help to slow the loss of heat from the home via windows. The article is from Mother Earth News magazine.
Wonder if a similar design could be made with space blankets to reflect or limit sunlight (and passive heat) entering thru windows in warmer climates?
Interesting thanks.
This past summer we bought this stuff that is used to insulate hot water tanks and you see it lots on RV windows. Can't remember what it was calle. It was silver, thicker, kinda quilted. We cut it to the size of the windows and attached it with two sided tape. Some windows we simply propped it between the shades and window. It seemed to keep it a little cooler. Wasn't fun to take down the ones with double sided tape this fall. Velcro might be a better idea.
Here is a link for a "Home Made Thermal Shade". The idea is once the home is warm to help use this to help to slow the loss of heat from the home via windows. The article is from Mother Earth News magazine.
Simple, money-saving thermal window shades made from insulated fabric with Velcro edging keeps temperatures moderate and eliminates window heat waste.
The goal of the article appears to be to provide plans for making several models of home made thermal shades that can be easily attached to widows during the night or colder periods to cut down on heat loss. The shades can still be easily move to allow passive solar heating (sun light) to enter the home during the day.
Wonder if a similar design could be made with space blankets to reflect or limit sunlight (and passive heat) entering thru windows in warmer climates?
You might want to check into Northern Tool, we recently bought a stove from them for an additional level of protection. The one we bought is propane(we have a large tank in the yard).
The reason I picked this one is because it doesn't require electricity, it isn't permanent it only requires a gas line (this model also comes in natural gas), it comes with an oxygen depletion sensor, and it's even on sale at the moment.
hmm looks like they won't ship those to Canada. I've never seen anything like that here before.
I know alot of people in this area have cabins that they heat. I'll check around and see what is in the store. I know must be quite a few using kerosene. We have had a few house fires from kerosene heaters. So that one I will stay away from.
I can easily pick up a coleman stove for cooking. Crack a window or even just put it on top on the stove and run the stove fan while its on.
You really think that a generator would be that inefficient? If it was running the fan on the furnace and the gas was still on. Even on the coldest days here I actually turn off the furnace and I have 2 portable electric heaters on the main floor. Those two on low keep the temperature in the kitchen and living room at about 71. On low each of those heaters are 600 w and on high they are 1500 watts. The generator I was looking at is 3500 watts. Our furnace is just run at night to keep the temperature from not going below 55.
You might want to check into Northern Tool, we recently bought a stove from them for an additional level of protection. The one we bought is propane(we have a large tank in the yard).
The reason I picked this one is because it doesn't require electricity, it isn't permanent it only requires a gas line (this model also comes in natural gas), it comes with an oxygen depletion sensor, and it's even on sale at the moment.
They have a similar model at homedepot.com, that they can't seem to keep in stock. I don't know if you could cook with it though.
Rinnai makes very nice ventless (as well as vented) space heaters. We saw these in a rental in Maine that we stayed in and were impressed with their efficiency. I am not so certain whether they would be equally as effective without electricity...or if they would even work without electricity.
I'm just suggesting there are both vented and ventless models available. Your local building supply store (do they do Home Depot in Canada?) would be able to help out, I expect.
Thanks Everyone. Well we are renting right now. So wood stove would be out of the question. If it was easier to install a wood stove and vent it outside might be an option.
Maybe one of the Mr. heater buddy ones would be a good idea. Are there any propane stoves that are safe for use indoors?
Thanks for the reminder on sealing the windows. I'll double check that we have enough left for next year. This year we have covered all the windows, put the insulated covers on the switches and plugs. We did the incense thing this year too lol. I have actually completely blocked the vent for the stove fan because it was such a breeze coming through.
Our house is 3 levels. So probably the main level is where we would stay and try to heat -kitchen, living room.
I also live in the north and have power outages in the winter. Recently our wind chill temperatures have been down to -45F.
I would never live dependent on electricity.
Using a propane heater without a vent can kill you. I have a small propane wall heater (with input and output vents) that runs without electricity. When the power goes out, the room with that heater can be isolated and keep everyone warm. It will also keep the house above freezing should you not be home when the power outage occurs.
For long term - get a wood stove and learn how to cook on it.


 Now I have to stack the racks myself with wood I have laying all around the yard. What a mess..plus a lot of extra work!


 , wall papered the whole apartment with foil. Covered the ceiling, walls, cabinets, doors and windows with foil. The news crew got so warm while filming the story they had to strip down to their shorts. The foiled apartment (sorry for the pun) acted as a parabolic dish. I keep a large roll of foil (Costco) and staples (no I mean stapler) for my safe room should I have to fall back to emergency mode with no heat and/or fuel.
Leave a comment: